Tutti gli articoli di Piero Maina

Advanced Professional Clubmaker “Class A” certified by PCS’s (The Professional Clubmakers Society – U.S.A.) – (Clubfitter – Clubmaker – Clubrepairer) – ICG (International Clubmakers Guild - U.S.A – Clubmaker and Clubfitter certified) - Rifle Center (U.S.A.) - PFC Center (Performance Fitting Center – U.S.A. ) e altre certificazioni. Principalmente sono un clubfitter,clubmaker e clubrepairer professionista che attraverso questo sito vuole divulgare le giuste informazioni che in questo campo non si hanno e offuscare tutti i falsi miti che i giocatori spesso credono veri. Ho aperto anche altri menù per raccontare le mie esperienze e passioni, sulla forma fisica/alimentazione e il percorso spirituale che mi accompagna attraverso “Un Corso in Miracoli”. Piero

Health And Fitness Is Not A 12-Week Program

Title: Health And Fitness Is Not A 12 Week Program

By line: By Tom Venuto, CSCS, NSCA-CPT

URL: www.BurnTheFat.com!

Word count: 2230 words

Not long ago, one of the members of my health club poked her head in my office for some advice. Linda was a 46 year old mother of two, and she had been a member for over a year. She had been working out sporadically, with (not surprisingly), sporadic results. On that particular day, she seemed to have enthusiasm and a twinkle in her eye that I hadn’t seen before.

“I want to enter a before and after fitness contest called the “12 week body transformation challenge.” I could win money and prizes and even get my picture in a magazine.”

“I want to lose THIS”, she continued, as she grabbed the body fat on her stomach. “Do you think it’s a good idea?”

Linda was not “obese,” she just had the typical “moderate roll” of abdominal body fat and a little bit of thigh/hip fat that many forty-something females struggle with.

“I think it’s a great idea,” I reassured her. “Competitions are great for motivation. When you have a deadline and you dangle a “carrot” like that prize money in front of you, it can keep you focused and more motivated than ever.”

Linda was eager and rarin’ to go. “Will you help me? I have this enrollment kit and I need my body fat measured.”

“No problem,” I said as I pulled out my Skyndex fat caliper, which is used to measure body fat percentage with a “pinch an inch” test.

When I finished, I read the results to her from the caliper display: “Twenty-seven percent. Room for improvement, but not bad; it’s about average for your age group.”

She wasn’t overjoyed at being ‘average’. “Yeah, but it’s not good either. Look at THIS,” she complained as again she grabbed a handful of stomach fat. “I want to get my body fat down to 19%, I heard that was a good body fat level.”

I agreed that 19% was a great goal, but told her it would take a lot of work because average fat loss is usually about a half a percent a week, or six percent in twelve weeks. Her goal, to lose eight percent in twelve weeks was ambitious.

She smiled and insisted, “I’m a hard worker. I can do it”

Indeed she was and indeed she did. She was a machine! Not only did she never miss a day in the gym, she trained HARD. Whenever I left my office and took a stroll through the gym, she was up there pumping away with everything she had. She told me her diet was the strictest it had ever been in her life and she didn’t cheat at all. I believed her, and it started to show, quickly.

Each week she popped into my office to have her body fat measured again, and each week it went down, down, down. Consistently she lost three quarters of a percent per week – well above the average rate of fat loss – and on two separate occasions, I recall her losing a full one percent body fat in just seven days.

Someone conservative might have said she was overtraining, but when we weighed her and calculated her lean body mass, we saw that she hadn’t lost ANY muscle – only fat. Her results were simply exceptional!

She was ecstatic, and needless to say, her success bred more success and she kept after it like a hungry tiger for the full twelve weeks.

On week twelve, day seven, she showed up in my office for her final weigh-in and body fat measurement. She was wearing a pair of formerly tight blue jeans and they were FALLING OFF her!

“Look, look, look,” she repeated giddily as she tugged at her waistband, which was now several inches too large.

As I took her body fat, I have to say, I was impressed. She hadn’t just lost a little fat, she was “RIPPED!”

During week twelve she dropped from 18% to 17% body fat, for a grand total of 10% body fat lost in three months. She surpassed her goal of 19% by two percent. I was now even more impressed, because not many people lose that much body fat in three months.

You should have seen her! She started jumping up and down for joy like she was on a pogo stick! She was beaming… grinning from ear to ear! She practically knocked me over as she jumped up and gave me a hug – “Thank you, thank you, thank you!”

“Don’t thank me,” I said, “You did it, I just measured your body fat.”

She thanked me again anyway and then said she had to go have her “after” pictures taken.

Then something very, very strange happened. She stopped coming to the gym. Her “disappearance” was so abrupt, I was worried and I called her. She never picked up, so I just left messages.

No return phone call.

It was about four months later when I finally saw Linda again. The giddy smile was gone, replaced with a sullen face, a droopy posture and a big sigh when I said hello and asked where she’d been.

“I stopped working out after the contest… and I didn’t even win.”

“You looked like a winner to me, no matter what place you came in” I insisted, “but why did you stop, you were doing so well!”

“I don’t know, I blew my diet and then just completely lost my motivation. Now look at me, my weight is right back where I started and I don’t even want to know my body fat.”

“Well, I’m glad to see you back in here again. Write down some new goals for yourself and remember to think long term too. Twelve week goals are important, but fitness isn’t 12 week program you know, it’s a lifestyle – you have to do it every day, for the rest of your life.”

She nodded her head and finished her workout, still with a defeated look on her face. Unfortunately, she never again come anywhere near the condition she achieved for that competition, and for the rest of the time she was a member at our club, she slipped right back into the sporadic on and off workout pattern.

Linda was not an isolated case. I’ve seen the same thing happen with countless men and women of all ages and fitness levels from beginners to competitive bodybuilders. In fact, it happens to millions of people who “go on” diets, lose a lot of weight, then quickly “go off” the diet and gain the weight right back.

What causes people to burn so brightly with enthusiasm and motivation and then burn out just as quickly? Why do so many people succeed brilliantly in the short term but fail 95 out of 100 times in the long term? Why do so many people reach their fitness goals but struggle to maintain them?

The answer is simple: Health and fitness is for life, not for “12 weeks.”

You can avoid the on and off, yo-yo cycle of fitness ups and downs. You can get in great shape and stay in great shape. You can even get in shape and keep getting in better and better shape year after year, but it’s going to take a very different philosophy than most people subscribe to. The seven tips below will guide you.

These guidelines are quite contrary to the quick fix philosophies prevailing in the weight loss and fitness world today. Applying them will take patience, discipline and dedication and they will put you in the minority. Just remember, the only thing worse than getting no results is getting great results and losing them.

1) Don’t “go on” diets. When you “go on” a diet, the underlying assumption is that at some point you have to “go off” it. This isn’t just semantics, it’s one of the primary reasons most diets fail. By definition, a “diet” is a temporary and often drastic change in your eating behaviors and/or a severe restriction of calories or food, which is ultimately, not maintainable. If you reach your goal, the diet is officially “over” and then you “go off” (returning to the way you used to eat). Health and fitness is not temporary; it’s not a “diet.” It’s something you do every day of your life. Unless you approach nutrition from a “habits” and “lifestyle” perspective, you’re doomed from the start.

2) Eat the same healthy foods consistently, all year round. Permanent fat loss is best achieved by eating mostly the same types of foods all year round. Naturally, you should include a wide variety of healthy foods so you get the full spectrum of nutrients you need, but there should be consistency, month in, month out. When you want to lose body fat, there’s no dramatic change necessary – you don’t need to eat totally different foods – it’s a simple matter of eating less of those same healthy foods and exercising more.

3) Have a plan for easing into maintenance. Let’s face it – sometimes a nutrition program needs to be more strict than usual. For example, peaking for a bodybuilding, figure, fitness or transformation challenge contest requires an extremely strict regimen that’s different than the rest of the year. As a rule, the stricter your nutrition program, the more you must plan ahead and the more time you must allow for a slow, disciplined transition into maintenance. Failure to plan for a gradual transition will almost always result in a huge binge and a very rapid, hard fall “off the wagon.”

4) Focus on changing daily behaviors and habits one or two at a time. Rather than making huge, multiple changes all at once, focus on changing one or two habits/behaviors at a time. Most psychologists agree that it takes about 21 days of consistent effort to replace an old bad habit with a new positive one. As you master each habit, and it becomes as ingrained into your daily life as brushing your teeth, then you simply move on to the next one. That would be at least 17 new habits per year. Can you imagine the impact that would have on your health and your life? This approach requires patience, but the results are a lot more permanent than if you try to change everything in one fell swoop. This is also the least intimidating way for a beginner to start making some health-improving changes to their lifestyle.

5) Make goal setting a lifelong habit. Goal setting is not a one-time event, it’s a process that never ends. For example, if you have a 12 week goal to lose 6% bodyfat, what are you going to do after you achieve it? Lose even more fat? Gain muscle? What’s next? On week 13, day 1, if you have no direction and no long term goal to keep you going, you’ll have nothing to keep you from slipping back into old patterns. Every time you achieve a short term goal (daily, weekly and 12 week goals), you must set another one. Having short term goals means that you are literally setting goals continuously and never stopping.

6) Allow a reasonable time frame to reach your goal. It’s important to set deadlines for your fitness and weight loss goals. It’s also important to set big, ambitious goals, but you must allow a reasonable time frame for achieving them. Time pressure is often the motivating force that helps people get in the best shape of their lives. But when the deadline is unrealistic for a particular goal (like 30 pounds in 30 days), then crash dieting or other extreme measures are often taken to get there before the bell. The more rapidly you lose weight, the more likely you are to lose muscle and the faster the weight will come right back on afterwards. Start sooner. Don’t wait until mid-May to think about looking good for summer.

7) Extend your time perspective. Successful people in every field always share one common character trait: Long term time perspective. Some of the most successful Japanese technology and manufacturing companies have 100 year and even 250-year business plans. If you want to be successful in maintaining high levels of fitness, you must set long term goals: One year, Ten years, Even fifty years! You also must consider what the long term consequences might be as a result of using any “radical” diet, training method or ergogenic aid. The people who had it but lost it are usually the ones who failed to think long term or acknowledge future consequences. It’s easy for a 21 year old to live only for today, and it may even seem ridiculous to set 25 year goals, but consider this: I’ve never met a 40 or 60 year old who didn’t care about his or her health and appearance, but I have met 40 or 60 year olds who regretted not caring 25 years ago.

Burn The Fat, Feed the Muscle (BFFM) is a fat loss program which acknowledges the simple truth that going “on diets,” entering “Fitness challenges” or competing in “Transformation contests” without having long term goals and a lifestyle attitude, is a recipe for failure. Don’t let yourself be part of the latest fitness dropout statistics: visit the Burn The Fat website for more details on how to change your lifestyle… and keep the change! www.BurnTheFat.com!

About the Author:

Tom Venuto is a lifetime natural bodybuilder, an NSCA-certified personal trainer (CPT), certified strength & conditioning specialist (CSCS), and author of the #1 best-selling e-book, “Burn the Fat, Feed The Muscle.” Tom has written more than 200 articles and has been featured in print magazines such as IRONMAN, Australian IRONMAN, Natural Bodybuilding, Muscular Development, Exercise for Men and Men’s Exercise, as well as on hundreds of websites worldwide. For information on Tom’s Fat Loss program, visit: www.BurnTheFat.com!
P90X Vs P90X2 I due programmi a confronto.

Titolo:  P90X Vs P90X2 I due programmi a confronto.
Autore: Piero Maina
Conteggio parole: 1392

Cominciamo col sentire direttamente dalla voce di  Tony Horton, il creatore dei due programmi, quali sono le differenze. Nel video seguente troverete la comparazione fra  P90X vs P90X2, in inglese.

P90X VS P90X2 – Tony Horton Explain

P90X vs P90X2 Mettiamoli a confronto

Qui sotto trovate una tabella comparativa fra i due programmi. Ecco le principali differenze fra P90X e P90X2

Programmi P90X P90X2
Obiettivi
Ottenere la migliore forma fisica della vostra vita
Incrementare le vostre prestazioni atletiche, di agilità forza, flessibilità e raggiungere uno stato di forma ancora migliore
Metodo di lavoro
Confusione muscolare utilizzando allenamenti per la resistenza,plyometric, cardio e yoga
Come il P90X, ma con l’aggiunta dell’allenamento P.A.P.(Post Activation Potentiation)
N° Fasi
3 Fasi ciascuna della durata di 30 giorni
3 fasi ciascuna della durata di 3-6 settimane (Più flessibile e personalizzabile)
Programma Settimanale
6 giorni a settimana, 1 giorno di riposo/stretching
5 giorni a settimana(2 giorni riposo o stretching/Foam roller)
N° Esercizi
12 Tipologie di esercizi
  • P90X – 01 Chest & Back.
    Forza e definizione. Flessioni e trazioni alla sbarra per un’ora di allenamento.
  • P90X – 02 Plyometrics.
    Forza esplosiva,salti,cardio all’estremo. Un’ora di intenso allenamento e aumenteranno le vostre performances.
  • P90X – 03 Shoulders & Arms.
    Ottimo allenamento per spalle e braccia.Otterrete forza e definizione
  • P90X – 04 Yoga X.
    Esercizi combinati per l’aumento della forza, dell’equilibrio,della flessibilità e della respirazione utilizzando tecniche yoga.
  • P90X – 05 Legs & Back.
    Squat, allungamenti e trazioni per un allenamento combinato gambe/schiena molto efficace.
  • P90X – 06 Kenpo X.
    Esercizi per l’allenamento cardiovascolare ad alta intensità. Comprende mosse di kick boxing ed esercizi in equilibrio che richiedono coordinazione.
  • P90X – 07 X Stretch.
    Stretching per migliorare la nostra flessibilità ed evitare infortuni.
  • P90X – 08 Core Synergistics.
    Allenamento per il core e muscolatura in generale.
  • P90X – 09 Chest, Shoulders & Triceps.
    Petto,Spalle e Tricipiti. Quant’è duro! Provare per credere!
  • P90X – 10 Back & Biceps.
    Schiena e Bicipiti. Molto intenso e completo, ma meno di quello sopra.
  • P90X – 11 Cardio X. Esercizi cardio brucia grassi.
  • P90X – 12 Ab Ripper X.
    Grande routine per gli addominali. 349 ripetizioni in 16 min. Con questa routine ho allenato e alleno i miei addominali.
12  (più 2 allenamenti estremi acquistabili separatamente)
  • P90X2 – 01 X2 CORE(57 min.) La base fondamentale del P90X2: Padroneggiate questo workout dedicato al core e vedrete tutto il resto migliorare di conseguenza.
  • P90X2 – 02 PLYOCIDE(57 min.)Un insieme di movimenti di coordinazione e forza esplosiva, allenatevi e guardate come miglioreranno le vostre performances.
  • P90X2 – 03 X2 RECOVERY + MOBILITY (approx. 58 min.)Stretching attivo e mobilità utilizzando l’elemento chiave: il foam rolling . .
  • P90X2 – 04 X2 TOTAL BODY (approx. 64 min.)Allenamento contro resistenza e instabilità per un allenamento generale molto efficace.
  • P90X2 – 05 X2 YOGA (approx. 68 min.)Aumento della forza isometrica migliorando la flessibilità e i muscoli stabilizzatori.
  • P90X2 – 06 X2 BALANCE + POWER (approx. 63 min.)Forza e destrezza. Il core viene ulteriormente sollecitato
  • P90X2 – 07 CHEST + BACK + BALANCE(57 min.) Allenamento effettuato in maniera instabile.Aumento della forza e dell’equilibrio diversamente dai classici pesi.
  • P90X2 – 08 X2 SHOULDERS + ARMS (approx. 53 min.)Ottimo allenamento per braccia e spalle. Sempre in condizioni di instabilità.
  • P90X2 – 09 BASE + BACK (approx. 56 min.)Plyo e trazioni alla sbarra per un’ora.
  • P90X2 – 10 P.A.P. LOWER (approx. 63 min.)Ho scritto un articolo a parte su questo allenamento, qui.
  • P90X2 – 11 P.A.P. UPPER (approx. 53 min.)Molti atleti di fama mondiale sono stati distrutti da questo allenamento.Ho scritto un articolo a parte su questo allenamento, qui.
  • P90X2 – 12 X2 AB RIPPER (approx. 17 min.)17 minuti di duro allenamento per gli addominali, ma è meglio dire per il core.
  • P90X2 – 13 V SCULPT(approx. 54 min.)Allenamento per schiena e bicipiti. Aumento della forza e del livello fitness in generale.
  • P90X2 – 14 X2 CHEST + SHOULDERS + TRIS(approx. 49 min.)Petto,Spalle,Tricipiti sempre sollecitati al massimo utilizzando piattaforme instabili (Swiss ball e palle mediche).
Durata Yoga
75 minuti
60 minuti
Piano Nutrizionale
Incluso
Incluso, con l’aggiunta di piani alimentari per i vegani e i celiaci e le ultime novità in fatto di alimentazione sportiva
Equipaggiamento minimo necessario
  • Barra per le trazioni
  • Bande elastiche o Manubri
  • Barra per le trazioni
  • Bande elastiche o Manubri
Ulteriore Equipaggiamento necessario
  • Tappeto per Yoga
  • Blocchi per Yoga (2)
  • Cardio frequenzimetro
  • Maniglie per le flessioni
  • Swiss Ball
  • Foam Roller
  • 2 Palle mediche da 4 kg.
Supplementi Alimentari Consigliati
  • P90X Recovery Drink
  • Shakeology
  • Proteine in Polvere
  • P90X Recovery Drink
  • Shakeology
  • Proteine in Polvere

Ho concluso dopo 4 mesi e mezzo il primo ciclo con il P90X2 e qui volevo scrivere la mia impressione “a caldo” rispetto al suo predecessore il P90X, con il quale mi sono allenato per un anno e mezzo. Va prima detto che è ovvio aver trovato una maggiore difficoltà alla partenza con il P90X, non solo per la tipologia degli esercizi che richiedevano una solida base di allenamento già in partenza e che io avevo anche se non così solida come avrei avuto più tardi dopo un paio di cicli  di allenamento e ancor più in seguito. Inoltre alla partenza a Settembre 2010 avevo una tibia con frattura da stress che mi ha impedito di allenare le gambe fino a Marzo 2011. Di converso ho iniziato ad allenarmi con il P90X2 a Gennaio 2012 proveniente da 5 cicli completi,(tranne le gambe nei primi due cicli) con il P90X e quindi la mia soglia di allenamento era alta, ciò nonostante la partenza non è stata delle più semplici, sia per il tempo necessario a meccanizzare gli esercizi, che proprio per la tipologia d’esercizio differente. Nel P90X2 è richiesto un utilizzo della muscolatura core molto più impegnativo così come la soglia dell’equilibrio si dovrà stabilizzare e le tipologie degli esercizi mirano ad un lavoro che premia maggiormente la pura performance atletica e la costruzione di un fisico “fitness” che la sola costruzione di un fisico da mostrare.(Apro una parentesi, non è che il P90X sia orientato a costruire un fisico che sia solo da mostrare,anzi…va solo detto che gli esercizi nel P90X2 si svolgono sempre su basi instabili e più che la massa muscolare,viene premiata la prestazione, ma non vorrei essere frainteso. Anche il P90X crea un vero fisico super, solo che gli esercizi sono più di tipo classico e a mio avviso è bene utilizzare esercizi di entrambi i programmi. Poi i risultati sulla massa muscolare sono determinati dall’allenamento contro resistenza e soprattutto dall’alimentazione) La mia esperienza a livello di risultati raggiunti è risultata molto valida, ma se vado a guardare da vicino le masse muscolari secondo me sono diminuite. Non di molto, no, sono ancora nella stessa classe di peso e anzi come avevo scritto nei precedenti articoli sto cercando di crescere un poco. Il mio lavoro non è mirato al bodybuilding puro, se no non seguirei questi programmi e il mio utilizzo di integratori si limita agli omega 3, sotto forma di capsule di Krill oil, glucosamina coenzima Q10 come antiossidante oltre al già citato omega 3, Fibre in quantità e un paio di cicli all’anno di creatina e niente altro. Sempre in riferimento a quanto già scritto, il mio scopo è di mantenere un fisico fitness oriented per un peso che sia l’altezza in centimetri della persona – 100, ma con una massa grassa molto ridotta, diciamo intorno al 6% e quindi per  me si traduce in 178cm. – 100 = 78 Kg. Solo che si parla di 74 Kg. di massa magra sui 78 kg. totali. Bene torniamo al nostro articolo, ora che entro nel pieno della stagione, non credo che farò un altro ciclo di P90X2 da subito e anzi in una prima seduta di P90X effettuata pochi giorni dopo il termine del primo ciclo di P90X2, ho notato l’efficacia dei vecchi esercizi del P90X e i muscoli “bruciavano” nei giorni seguenti, addome compreso. Pertanto ci sarebbe la voglia di tornare a fare 90 giorni di P90X puro, visto che sono esercizi che esaltano comunque le doti atletiche, ma rispettano maggiormente i canoni tradizionali. Di contro, non vorrei perdere le doti di equilibrio,atleticità e forza acquisite con il P90X2 ed essendo questo programma flessibile e integrabile con il suo predecessore o anche con l’insanity, ho deciso di fare i prossimi 90 giorni di allenamento con un programma ibrido che alternerà i due programmi in una sorta di confusione muscolare ancora maggiore e la certezza di ottenere risultati superiori sotto tutti i punti di vista. Alla fine però non mi sono espresso su quale sia meglio fra i due secondo me. In effetti non posso dire che uno sia meglio dell’altro, dipende da cosa si cerca. Con il P90X si è davvero in forma e con il P90X2 si rifinisce il lavoro…..GARANTITO!

© Copyright 2012 – 2024  Piero Maina – Tutti i diritti riservati

P90X2 – P.A.P. LOWER + P.A.P. UPPER

Titolo:  P90X2 – P.A.P. LOWER + P.A.P. UPPER
Autore: Piero Maina
Conteggio parole: 1088

Ho completato il programma P90X2 che ho cominciato a gennaio e ho protratto fino ad oggi, allenandomi fino a sei settimane per le prime due fasi e 4 settimane per l’ultima che comprende gli esercizi P.A.P. (Post Activation Potentiation) come riportato nel titolo. Pertanto i giorni di allenamento sono stati oltre 120 contro i 90 che uno si aspetterebbe. Questo articolo dedicato agli esercizi dell’ ultima fase o fase 3, vuole spiegare come funzionano gli allenamenti P.A.P.  per la parte bassa e alta del corpo visto che si tratta di una vera novità nel panorama dei vari circuiti di allenamento conosciuti.

Guardiamo da vicino come sono composte queste due sessioni di allenamento:

P.A.P. (Post Activation Potentiation) sono allenamenti unici nel loro genere come ho giá scritto sopra e sono composti da una serie di esercizi che vengono chiamati ‘complexes’.  Sono due serie di esercizi, ciascuna composta da 4 esercizi combinati in modo da effettuare un lavoro sinergico che coinvolga ciascuna area interessata. Il P.A.P. allena praticamente tutto: core, potenza esplosiva, plyo, forza,resistenza e cardio il tutto ad un ritmo elevato.

Lo scopo è quello di esaltare le doti atletiche piuttosto che creare il muscolo solo per mostrarlo e il risultato è quello di ottenere migliori prestazioni atletiche allenandosi in maniera più funzionale. E vi assicuro che anche se siete atleti molto allenati alla fine di una sessione di P.A.P. sarete stremati e sudati come un calzino, comunque ne beneficieranno le vostre prestazioni atletiche e salterete  più alto e correrete più forte. Questo vale anche per i cosiddetti atleti “della domenica”. Naturalmente per loro sarà necessario un periodo di adattamento più lungo.

Guardiamo prima il P.A.P. Lower (Arti Inferiori)

Pro: Come ho scritto sopra tutto viene attivato, glutei compresi.

Contro: Teoricamente se siete arrivati alla fase 3 o fase P.A.P. dovreste già essere in buona forma, ma siccome alcuni esercizi vengono effettuati su un solo arto, se il core non è sufficientemente allenato potreste non riuscire al meglio.

Composizione degli esercizi: Riscaldamento, 4 esercizi complex, pausa idratazione di 1 min., 4 esercizi complex differenti, raffreddamento.

P90X2 PAP Lower Prima Serie

– Step Up Convict (necessario uno sgabello o rialzo e manubri)
– Skater Plyo (Balzi laterali come i pattinatori)
– One Leg Line Hop (Saltelli rapidi su una gamba)
– Tony’s Triangle (Esercizio isometrico per i glutei e core)

P90X2 PAP Lower Seconda Serie

– Squat Cross Reach (Necessarie due palle mediche e manubri)
– Split Squat Jump (Balzi sul posto in accosciata gamba avanti/indietro)
– Monster Slalom Jump (Balzi laterali ad altissima velocità e massima distanza)
– Side Bridge Leg Lift (Esercizio isometrico per il core molto impegnativo)

*Materiale Opzionale: Nastro adesivo da mettere sul pavimento, Salvietta e sgabello o rialzo, ma io salgo sul bordo del divano.

Alla fine di questo allenamento il fiato sarà veramente corto e come tutti gli allenamenti dipenderà anche dal grado del vostro impegno e la correttezza di esecuzione oltre al peso utilizzato. In ogni caso vi renderete conto di quanto sia impegnaticvo il P.A.P. Lower.

Ora guardiamo da vicino il P.A.P. Upper (Parte alta del corpo)

Iniziamo col dire che è veramente tosto, naturalmente va sempre visto come viene eseguito l’esercizio, ma se non siete allenati schianterete sul posto! Complessivamente tutte le aree muscolari della parte alta vengono sollecitate, ma non con lo stesso metodo del classico workout di palestra e nemmeno del classico P90X. Si tratta di  4 serie di 4 esercizi, poi dopo la pausa acqua altre 4 serie di 4 differenti esercizi.  In questo allenamento non ci sono gli Ab Ripper al termine, in quanto gli addominali vengono stimolati a livello di core nei vari esercizi, sia isometrici che in quelli dinamici con la palla medica.

Materiale necessario:

Barra per le trazioni, Manubri, Elastici, sgabello o rialzo, 2 asciugamani, foam/rumble roller, palla medica e Swiss ball.

*Se non avete gli elastici anche un bastone,magari appesantito, può servire allo scopo.

P90X2 PAP Upper Prima Serie

– Renegade Row (Flessioni/Trazioni con manubri)

– Plyo Push Up (Flessioni con il battito delle mani)

– Plank on Med Ball (Posizione “Plank” con i piedi sulla palla medica)

– Superman (Esercizio per i muscoli lombari/core con bastone appesantito)

Questi 4 esercizi per 4 volte senza pausa e al termine pausa acqua di 1 minuto.

P90X2 PAP Upper Seconda Serie

– Towel Pull Ups (Trazioni alla sbarra tenendosi a due asciugamani)

– Med Ball Pike (Addominali crunch con palla medica)

– Step Up Hammer Press (Spalle – Alzate con manubri e gamba sollevata su rialzo)

– Roller Angel (Stretching attivo sul foam Roller)

Al termine raffreddamento e stretching.

Tutto ciò di cui sopra, nonostante i video che possano far sembrare gli esercizi una “passeggiata”, viene svolto a ritmo elevato e rigorosamente senza pausa. E’ molto duro, soprattutto la prima serie di 4 esercizi dell’upper workout, ma se eseguiti con impegno tutti gli esercizi del P.A.P. ci metteranno alla frusta. Con questa mia affermazione non desidero farvi pensare a qualcosa di particolarmente duro e punitivo, è solo che si tratta di una serie di esercizi che richiedono allenamento e volontà e una volta che gli esercizi saranno “ingranati”, la gratificazione e la forma ottenuta ci ripagheranno dell’impegno.

Va inoltre aggiunto che c’è sempre la dimostrazione per chi si trova in viaggio con materiale di fortuna e quindi anche se non “spinto” al massimo l’esercizio può sempre essere eseguito. Va da se che i migliori giudici per il nostro corpo siamo noi stessi e pertanto se avvertiamo vertigini o senso di disagio evitiamo di spingere al massimo da subito.

In sintesi è un bel lavorare e per questo ho voluto scrivere un articolo dedicato al P.A.P. Resto dell’idea però, che il P90X è sempre valido e per certi versi forse anche di più del P90X2, diciamo che hanno una finalizzazione differente e nessuno ci proibisce, anche per la loro natura flessibile, di utilizzare in maniera ibrida e combinata i vari esercizi, proprio per raggiungere il miglior risultato a seconda delle nostre finalità. Se notate il fisico di Tony Horton nel P90X2 rispetto al P90X è nettamente più “tirato” e sembra quasi aver perduto la sua massa, sia nelle gambe che nelle braccia. Per quanto riguarda il mio risultato sono decisamente in forma e sono migliorato sotto il punto di vista della mobilità, equilibrio e core che sono alla base per l’esecuzione di tutti gli esercizi. Non posto le mie foto attuali perchè non sono così diverse da quelle che potete vedere nell’articolo Burn The Fat La mia esperienza questo perchè il mio lavoro è finalizzato al raggiungimento della massima forma con aumento della massa magra per la fine di Agosto.

Prossimamente scriverò la mia opinione fra il P90X Vs P90X2.

© Copyright 2012 – 2024  Piero Maina – Tutti i diritti riservati

Why Some People Quit And Some People NEVER Give Up

Title: Why Some People Quit And Some People NEVER Give Up

By line: By Tom Venuto, CSCS, NSCA-CPT

URL: www.BurnTheFat.com!

Word count: 627 words


Throughout my 18 years in the fitness industry as a trainer, nutrition consultant and motivational coach, I have noticed that some people who start a nutrition and exercise program give up very easily after hitting the first obstacle they encounter. If they feel the slightest bit of discouragement or frustration, they will abandon even their biggest goals and dreams.

On the other hand, I noticed that some people simply NEVER give up. They have ferocious persistence and they never let go of their goals. These people are like the bulldog that refuses to release its teeth-hold on a bone. The harder you try to pull the bone out of his mouth, the harder the dog chomps down with a vice-like grip.

What’s the difference between these two types of people? Psychologists say there is an answer.

An extremely important guideline for achieving fitness success is the concept that, “There is no failure; only feedback. You don’t “fail”, you only get results.”

This is a foundational principle from the field of Neuro Linguistic Programming (NLP), and the first time I ever heard it was from peak performance expert Anthony Robbins back in the late 1980’s. It’s a principle that stuck with me ever since, because it’s a very, very powerful shift in mindset.

A lot of people will second-guess themselves and they’ll bail out and quit, just because what they try at first doesn’t work. They consider it a permanent failure, but all they need is a little attitude change, a mindset change, or what we call a “reframe.”

Instead of saying, “This is failure” they can say to themselves, “I produced a result” and “This is only temporary.” This change in perspective is going to change the way that they feel and how they mentally process and explain the experience. It turns into a learning opportunity and valuable feedback for a course correction instead of a failure, and that drives continued action and forward movement.

It’s all about your results and your interpretation of those results

Dr Martin Seligman, a professor of psychology at the University of Pennsylvania, did some incredible research on this subject and wrote about it in his book, Learned Optimism. Dr. Seligman noticed that the difference between people who give up and people who persist and never quit is what he referred to as “explanatory style.” He said that explanatory style is the way we explain or interpret bad events or failures.

People who habitually give up have an explanatory style of permanence. For example, they hit a plateau in their progress and explain it by saying, “diets never work” or “I have bad genetics so I’ll always be fat.” These explanations imply permanence.

Other people hit the same plateaus and encounter the same challenges, but explain them differently. They say things such as, “I ate too many cheat meals this week,” or “I haven’t found the right diet for my body type yet.” These explanations of the results imply being temporary.

People who see negative results as permanent failure are the ones who give up easily and often generalize their “failure” into other areas of their lives and even into their own sense of self. It’s one thing to say, “I ate poorly this past week because I was traveling,” (a belief about temporary behavior and environment), and to say, “I am a fat person because of my genetics” (a belief about identity with a sense of permanence). Remember, body fat is a temporary condition, not a person!

People who see challenges and obstacles as temporary and as valuable learning experiences are the ones who never quit. If you learn from your experiences, not repeating what didn’t work in the past, and if you choose to never quit, your success is inevitable.

About the Author:

Tom Venuto is a lifetime natural bodybuilder, an NSCA-certified personal trainer (CPT), certified strength & conditioning specialist (CSCS), and author of the #1 best-selling e-book, “Burn the Fat, Feed The Muscle.” Tom has written more than 200 articles and has been featured in print magazines such as IRONMAN, Australian IRONMAN, Natural Bodybuilding, Muscular Development, Exercise for Men and Men’s Exercise, as well as on hundreds of websites worldwide. For information on Tom’s Fat Loss program, visit: www.BurnTheFat.com!

TrackMan III con TPS video o Flightscope X2i complete ? – Update –

Titolo:  TrackMan III con TPS video o Flightscope X2i complete ? – Update –

Autore: Piero Maina

Conteggio parole: 680

Ciao, ho deciso di scrivere un mini articolo solo per dare seguito a quello che avevo scritto nel primo articolo TrackMan III con TPS video o Flightscope X2i complete ? e anche perchè gli update che avevo aggiunto non venivano letti perchè nessuno sapeva degli inserimenti, visto che la data originaria dell’articolo risaliva al 19 gennaio 2012.

Nell’articolo originale avevo scritto che avrei avuto modo di provare il TrackMan III e il Flightscope X2  nel mio locale indoor con un lato utile di 6,5 mt. e la mia preoccupazione era di investire in un prodotto molto costoso che utilizza la tecnologia radar, che è lo stato dell’arte in quanto a fruibilità e precisione dei dati rilevati in ambiente esterno, ma in ambiente indoor non è proprio la stessa cosa, soprattutto per quanto riguarda il dato del backspin.

Come sapete il discorso nasceva perchè il nuovo prodotto della Flightscope è stato dichiarato comparabile ed altrettanto preciso come il TrackMan III, la differenza è che bisogna spendere € 10.000 in più per il TrackMan. Fino a qualche anno fa la differenza era più giustificata dal fatto che i dati del Flightscope (Kudu) erano praticamente inutilizzabili e quindi TrackMan lavorava in regime di monopolio, ma adesso?

Ad oggi la prova l’ho effettuata solo con il Flightscope X2 e l’ho comparato con i miei Golftek Pro III  e Pro 7 e il CG2 della Foresight . Per essere preciso avevo già provato il Flightscope a febbraio con scarsissimi risultati, tant’è che mi ero rassegnato, ma avendo effettuato  il test contestualmente con il ProIII , c’era la possibilità, poi confermata, che l’apparato della Golftek lo avesse disturbato. Questa volta invece i dati rilevati dall’X2 sono stati abbastanza attendibili e la prova è stata effettuata fianco a fianco con il CG2 che per tecnologia differente, rileva sicuramente con maggior affidabilità il dato del backspin in ambiente indoor. Per quanto riguarda le misurazioni effettuate con i ferri i dati delle due unità sono stati abbastanza omogeni, non proprio alla  alla virgola, ma comparabili, con l’eccezione del dato di backspin che anche con il piccolo adesivo incollato alla palla (necessario perchè il radar ne misuri le rotazioni) non faceva rilevare un dato affidabile al Flightscope per ogni tiro. Va detto che ogni tanto anche questo dato era comparabile con il CG2!!! Differente il comportamento con il drive, i dati sono stati sostanzialmente omogenei su tutti i fronti, anche per il backspin. Il perchè? Sinceramente non lo so!

Ho testato poi il mio Golftek contro il CG2 e i dati sono stati veramente identici. Sapevo che i miei apparati per uso indoor sono veramente affidabili, ma con la tecnologia che avanza, la possibilità di lavorare in ambiente esterno e la quantità di dati analizzabili oltre al software molto più avanzato, mi facevano propendere per l’eventuale acquisto. C’è solo un ma, in ambiente indoor ho visto che posso continuare a lavorare con i miei due Golftek perchè più che affidabili, nel frattempo proverò più estensivamente il Flightscope che oltretutto aumenterà di prezzo di un 3% il prossimo primo giugno. Al momento sono molto tentato dal Flightscope, ma devo ancora effettuare la prova con il TrackMan III e vedere quanto si discosta in meglio o in peggio rispetto al Flightscope e la differenza nel software fra i due, utilizzando come termine di paragone i miei Golftek che ho controllato essere validi e nel frattempo lasciare che sia il mercato ad effettuare il livellamento di prezzo che normalmente avviene quando c’è una sana competizione. Vi ricordo che ci sono sempre quei € 10.000 di differenza fra i due prodotti che non troverebbero giustificazione. Mi aspetto anche un inserimento da parte di TrackMan della possibilità di lavorare in Wi-Fi  con Ipad e Smartphones come già fa il Flightscope e quindi non essendo più così pressato dal fatto di non avere apparati affidabili, posso effettuare la mia scelta con maggior calma, pur sapendo che in ambiente tecnologico se uno aspetta sempre la novità non acquista mai.

Vi terrò informati. Stay Tuned!

© Copyright 2012 -2023  Piero Maina – Tutti i diritti riservati

No Pain No Gain: Fitness Myth or Ultimate Fitness Truth?

Title: No Pain No Gain: Fitness Myth or Ultimate Fitness Truth?

 By line: By Tom Venuto URL: www.BurnTheFat.com!

Word count: 1086 words

No Pain, No Gain. Is this aphorism just a fitness myth and downright bad advice? A lot of people seem to think so. As a bodybuilder with 25 years of training experience and more than two dozen trophies on my shelf, I have another perspective to offer you. Success with your body and in every area of your life is all about stepping outside of your comfort zone and that means embracing pain.

To reach high levels of physical and personal success you must approach your training, and your entire life, as an endeavor in constant growth. The ultimate truth is, you are either moving forward or moving backward; growing or dying. There’s no such thing as comfortably maintaining.

To grow, you must step above past achievements; beyond your perceived boundaries and limits. That means stepping out of the known, into the unknown; out of the familiar and into the unfamiliar; out of the comfortable into the uncomfortable. You must get out of your comfort zone.

The Late Cavett Robert, who was founder of the National Speakers Association, said something I’ll never forget: “Most people are running around their whole lives with their umbilical cords in their hands and they’re looking for some place to plug it back in.”

Most people are scared of the unknown. They prefer to stay in that womb of comfort. When the going gets tough; when the effort gets painful, when the work gets hard, they always pull back into safety. But the extraordinary people do the opposite. They know they have to get out of the comfort zone, and into new territory or they’ll stagnate and die.

Walt Disney once said that he never wanted to repeat a past success. He was always creating something new. They called it “Imagineering.” Disney’s mission was to continuously dream up and create things they had never done before, and look at what Disney has become today.

Here’s a little quote that you should post on your bulletin board, your computer desktop or somewhere you will always see it:

“Do what you always did, get what you always got.”

You can’t grow or change by doing what you’ve already done. You’ve got to train just to prevent yourself from going backwards. Maintenance doesn’t occur when you do nothing, maintenance is working to fight entropy, the tendency for things to naturally deteriorate.

Still, most people won’t leave their comfort zones. They won’t do it in business, they won’t do it in their personal lives. They won’t do it in their sport. They won’t do it for personal health and fitness. Why? The answer is simple… It hurts.

By definition, what’s it like outside the comfort zone? It’s UN-COMFORTABLE, right? Change is uncomfortable. Sometimes it’s physically painful, but it’s always mentally and emotionally painful, in the form of discipline, sacrifice, uncertainty and fear.

The maxim, “no pain no gain” gets knocked all the time as if it were bad advice. The fact of life is that you don’t grow unless you’ are constantly stepping outside the comfort zone, and outside the comfort zone is discomfort and pain.

I find that it’s mostly the non-achievers who make out “no pain, no gain” to be a bad thing. But the winners get it. The champions understand stepping outside the comfort zone in a healthy context, so they embrace it.

When you’re talking about the Olympics, or pro bodybuilding or the Super Bowl or a world championship, you’d better believe it’s physical pain, it’s discipline, it’s sacrifice, it’s blood, sweat, and tears – literally. But for most people who simply want to go from unfit to fit, from overweight to ideal weight, it’s not so much about physical “pain”; it’s more like stretching yourself.

How do you develop flexibility? What does your trainer tell you? You stretch to the point of discomfort, but not to the point of pain, right? You get into a position of slight discomfort and you hold it just long enough, then what happens? The discomfort goes away, because the muscle becomes more pliable, and the range of motion is increased.

Each time, you stretch a little further, just barely into the range you’ve never been in before, and eventually, you’re doing the splits. And why do you approach it like that? Because you don’t want to injure yourself. Stretch too far, too fast and your muscle tears.

The elite athletes and high achievers really have to push themselves; they’re going to push their boundaries and test their limits. But if you’re not an elite athlete or seasoned bodybuilder, and you take the advice, “no pain, no gain” too literally, you’re going to end up getting injured.

I always say to my training partner when I watch him cringing during a set and he finishes up with that pained look on his face, “Are you injured, or just hurt?” He knows what I’m talking about. If he says he’s hurt, I say, “OK, good. As long as you’re not injured. Let’s get on with it. Next set.”

It’s not about injury. That is bad pain. That is stupidity. But do stretch yourself. You can’t improve unless you stretch yourself. If that’s what some people want – if they just want to “stay fit” – OK fine. It actually doesn’t take that much to stay fit, once you’ve already achieved it.

But what if you want to improve? What if you want a new body? What if you want to change? If that’s what you want, you’ve got to push yourself a little. You’ve got to break comfort zones. And if your body is not changing, then I don’t care how hard you think you’re working, whatever you’re doing right now is inside your comfort zone.

The statement “no pain, no gain” has been misinterpreted, criticized and labeled a fallacy by many. However, the people doing the criticizing are almost always comfort zoners who haven’t achieved much. Don’t listen to them. Instead, follow the small percentage of people who step out and achieve great things. If you don’t like the sound of it, then say, “No effort, no gain.” We’re still talking about the same thing.

Embrace the discomfort like the champions do. Soon it subsides, you enjoy the benefits of the change and the pain is forgotten. You’ve reached a new, higher plateau of achievement. Enjoy the view for a short while. But be on guard because it’s not long before that higher level becomes your new comfort zone and then its time to press on again.

About the author
Tom Venuto is a lifetime natural (steroid-free) bodybuilder, freelance writer and best selling author of www.BurnTheFat.com,Feed The Muscle: Fat Burning Secrets of the World’s Best Bodybuilders and Fitness Models. Tom has been featured in IRONMAN, Australian IRONMAN, Italian IRONMAN (Olympian’s News), Natural Bodybuilding and Fitness, Muscular Development, Men’s Exercise, and Men’s Fitness Magazines. Tom’s hard work, no-quick fixes approach has won him multiple titles in drug tested bodybuilding including Mr. Natural Pennsylvania, Natural New Jersey, Natural New York State, Natural Mid Atlantic States and NPC Natural Eastern Classic championships. More important, tens of thousands of people in 141 countries have used Tom’s Burn The Fat program to lose as much as 253 pounds or just the last stubborn 5-10 pounds and achieve that coveted 6-pack of abs. To learn more about Tom’s all-natural approach to fat burning, visit his site at www.BurnTheFat.com!

L’angolo di lie….un imperativo!

Titolo:  L’angolo di lie….un imperativo!

Autore: Piero Maina

Conteggio parole:  1343

Come già detto per l’angolo di loft, ribadisco il concetto altrettanto importante di avere l’angolo di lie corretto soprattutto per il set di ferri. Ma anche il putt non sarà da meno, mentre questa variabile diventa di minore importanza sui legni da terra e ancor minore sul drive, ma non totalmente trascurabile.

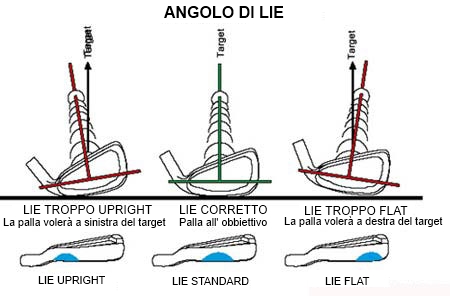
Per definizione l’angolo di lie di un bastone da golf è quell’angolo che viene a crearsi fra lo shaft e la testa del bastone quando la suola tocca perfettamente il centro sul suolo dove appoggia.(Vedi qui il disegno per la spiegazione)

Diciamo che per tutti i bastoni nella sacca la correlazione fra lunghezza del bastone e angolo di lie è fondamentale, infatti se utlizzeremo un ferro di lunghezza superiore a quella che dovrebbe essere adatta a noi, con un angolo di lie corretto quel ferro sarà ancora perfettamente utilizzabile (a patto di avere la giusta abilità golfistica e buona coordinazione occhio/mano), al contrario di un ferro dalla lunghezza corretta,ma con un angolo di lie lontano da quello ideale per noi. Io sono solito ribadire che gli angoli soprattutto sui ferri e putt sono un imperativo e ancor più per i ferri alti di loft (dal ferro 8 in su), questo perchè il lie è il principale responsabile della direzione e quindi precisione nel colpo effettuato. Comunque anche per i ferri lunghi, c’è l’influenza a livello di solidità del colpo e quindi vedremo cambiare drasticamete in meglio anche un ferro 3 che per il suo ridotto loft (circa 21°) non sembrerebbe avere importanza per un angolo di lie ottimale, ma quando il lie sarà corretto il beneficio che ne trarremo sarà enorme. Ma in che modo il loft correlato al lie ne influenza la direzione?

Guardando  l’immagine qui a fianco capirete meglio cosa fa in pratica il lie sbagliato.

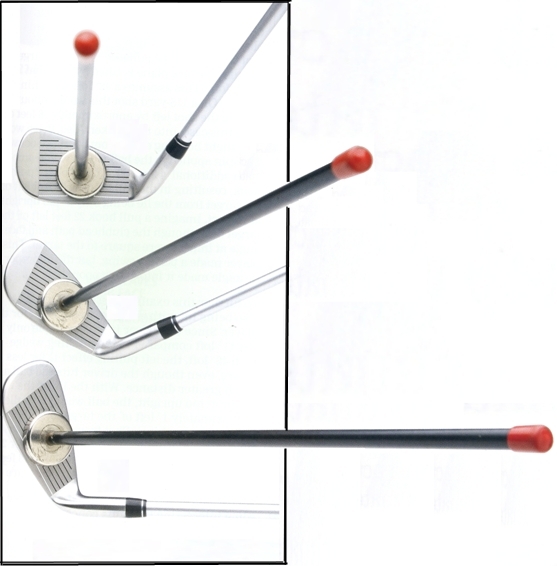
Chiaramente il disegno non ci spiega tutto e adesso vi chiedo di fare spazio alla vostra immaginazione. Se immaginate un ferro 8 l’esempio è perfetto. Nel caso di di sinistra il lie risulta essere troppo upright perchè il segno lasciato sulla suola del ferro è verso il tacco, di conseguenza la palla volerà verso sinistra proprio per effetto del loft. Nel mezzo dove la suola tocca il suo centro grazie a un angolo di lie corretto, se anche la faccia del ferro sarà orientata perpendicolarmente all’obbiettivo avremo un volo di palla perfetto e nell’ultimo esempio a destra,visto il lie inclinato verso la punta e quindi troppo flat, avremo un volo di palla verso destra sempre per effetto del loft “inclinato”. Un ferro 8 misura mediamente 39° di loft e pertanto se il bastone fosse ulteriormente inclinato a sinistra verso il terreno fino ad arrivare ad appoggiare completamente ad esso, la nostra palla non volerebbe a sinistra di “qualche” grado, ma la faccia del ferro in questione avrebbe una direzione a sinistra di quanti sono i gradi del loft e quindi di 39°. Di converso se i gradi fossero 0 (zero), non ci sarebbe nessuna influenza da parte del loft sull’angolo di lie. Per questo motivo tanto minore sarà il loft e tanto minore sarà l’importanza del lie a livello direzionalità su quel bastone. Forse se inserisco un’altra immagine, questo concetto appena spiegato verrà compreso meglio: In questi esempi viene utilizzato un semplice, ma validissmo strumento per farci comprendere il volo della palla, si tratta di un asticella magnetica che applicata alla faccia del bastone ci permetterà d’immaginare il volo della palla. La prima foto ci mostra un volo di palla con il ferro 8 dall’angolo di lie corretto, la seconda foto ci mostra invece il volo della palla a sinistra determinato da un’alterazione dell’angolo di lie troppo uprigth e quindi sul tacco e l’ultima foto in basso ci mostra l’esempio eccessivo di un bastone che sia appoggiato completamente al terreno con la faccia che mira a sinistra tanti gradi quanto sono i gradi di loft di quel bastone e in questo caso 39° perchè stiamo parlando di un ferro 8 medio. Per una spiegazione più tecnica ed esaustiva cliccate qui: (Clicca per aprire l’immagine) La tavola che avete visto sul link è spinta all’estremo e forse un po’ troppo tecnica, ma questo esempio ci mostra ulteriormente l’importanza di avere l’angolo di lie corretto per chi gioca e tanto più per i bastoni alti di loft che sono quelli che realizzano maggiormente lo score. Infatti anche se effettuerò un colpo perfetto all’asta, se l’angolo di lie non sarà corretto o io compenserò con allineamenti del corpo o del bastone o con apertura o chiusura della faccia il differenziale di precisione o è certo che mancherò l’asta o il green con evidenti conseguenze. Qualcuno potrà contestare il fatto che gli angoli di lie quando vengono misurati in maniera dinamica vengono sempre misurati in condizioni perfettamente in piano mentre nel gioco reale la palla in piano non la si trova quasi mai, ma questo aspetto non deve trarre in inganno. E’ vero che quando troverò la palla più alta o più bassa dei piedi mi allineerò di conseguenza cercando di compensare il dislivello, ma devo sapere che il mio bastone ha gli angoli corretti per me e se effettuerò il colpo in maniera corretta risponderà al meglio.

Ho scritto che il lie viene misurato in maniera dinamica. Infatti staticamente potremmo giungere a conclusioni affrettate. E’ certo che nella posizione iniziale all’address avrò un primo riscontro della correttezza dell’angolo di lie soprattutto se sarò un giocatore dalle caratteristiche morfologiche lontane dagli standard e quindi come già scritto sopra avrò magari bastoni modificati sulla lunghezza, ma che devono poi essere riparametrati nell’angolo di lie. Quello che però non viene mostrato nella posizione statica iniziale è il risultato all’impatto. Pertanto se all’address osservando la punta del mio ferro la vedrò innalzata, non devo pensare che quel ferro sia necessariamente upright per il mio gioco o caratteristiche morfologiche, in quanto nello swing il bastone si muove attorno al corpo in maniera e velocità differenziate a seconda di chi manovra il bastone e anche con shaft dal profilo più o meno rigido. Dal punto di vista della tecnica del golf e della fisica di solito le mani arrivano all’impatto in posizione più alta rispetto alla posizione di partenza annullando quindi l’angolo iniziale e il bastone che si muoverà attorno al corpo, “dovrebbe” per effetto della forza centrifuga e del peso della testa, abbassarsi proprio sulla punta annullando l’angolo iniziale (toe down). Però non sempre questo accade e per tale motivo si controlla il risultato della testa all’impatto mettendo del nastro isolante sotto la suola in  modo che ci mostri i segni lasciati strusciando su una tavoletta adatta allo scopo. La cosa è valida nella maggiorparte dei casi, tranne nel caso di suole dei ferri con raggi troppo arrotondati o cavità dove potremmo ricavare verità falsate. L’esperienza del fitter poi dovrà saper leggere eventuali colpi erratici e quindi raccomando sempre di verificare ogni singolo bastone e cercarne la correlazione all’interno del set testato. Certo se lo swing è “work in progress” si potrà pensare che anche l’angolo di lie potrebbe modificarsi nel tempo, ma sappiate che secondo la mia esperienza questa cosa richiede veramente molto tempo prima di avvenire,se mai avverrà e sono quindi più propenso a pensare che il lie sia come la propria firma.

Un ultima nota va detta appunto sui giocatori asimmetrici i quali si troveranno ad avere i ferri lunghi più upright e i ferri corti più flat e in alcuni casi invece è valido l’opposto. Come al solito non mi fate entrare tropppo nel tecnico, ma vi assicuro che questi casi sono molti di più di quanto possiate pensare.

Chiudiamo con il lie del putt. In questo caso la cosa è ancora più macroscopica e l’avere una testa che appoggi perfettamente al centro è un “must”. Naturalmente a patto di avere la giusta lunghezza con il giusto grip, il giusto peso e il giusto loft.

Mi raccomando fate un check sull’attrezzatura appena potete almeno per gli angoli, potreste scoprire piacevoli o amare sorprese. Buon gioco!


© Copyright  Piero Maina – Tutti i diritti riservati


The Little Thing in Your Head That’s Keeping You Fat

Title: The Little Thing in Your Head That’s Keeping You Fat

By line: By Tom Venuto

URL: www.BurnTheFat.com!

Word count: 1685 words

The Little Thing in Your Head That’s Keeping You Fat

By Tom Venuto

I have no doubt that a scientist somewhere just read the title of this article and said out loud, “YES! Venuto is right! That little thing in your head – the hypothalamus – it IS the thing that is keeping you fat! By George, that Venuto guy isn’t a dumb bodybuilder after all – he’s been doing his research!” At which moment, I will be shaking my head and thinking, “you need to get out of the laboratory and into the real world, with real people, buddy.” Okay, okay, to be fair, Neuro-endocrine control of appetite and body fat really is quite fascinating. But today, I’m talking about PSYCH-ology, not PHYSI-ology. The little thing in your head that’s keeping you fat is actually just a….

Limiting belief!

Self-limiting beliefs are among the biggest problems that people deal with in their struggles to achieve a healthy ideal weight. They’re also one of the reasons that so many people start to falter or fall off the diet and exercise wagon as early as late January or early February in their New Year’s goal pursuits.

If you’re that science guy I spoke of and you’re about to bail because you’re thinking, “Here we go again… another psycho-babble, self help article,” then think again. A belief is the force behind the placebo effect, which is well known by every scientist and medical professional. A respected doctor gives a patient a pill and is told it’s a powerful drug. The patient gets well immediately, not knowing that the “miraculous” substance was a dummy pill. Inert. Sugar. The miracle was in the mind.

But beliefs are not only involved in the mind-body connection, they are unconscious programs that control your behavior. The most important factor in whether you achieve the body and the health you want is NOT what diet or training program you follow. It’s what makes you follow your diet and training program. And guess what? What you believe controls your behavior – whether you will stick with your program or sabotage it with cheating, bingeing or inconsistency.

What to do about limiting beliefs

Ok, so now you agree that beliefs are psychological factors that affect you physically by controlling your behavior, including your eating, exercising and lifestyle. What now? 3 steps. 2 questions.

STEP 1: IDENTIFY LIMITING BELIEFS

You are fully aware of many of your beliefs. For example, beliefs about spirituality or politics are usually in the front of your conscious mind.

But the beliefs that hold back your health and physical development the most are usually the ones you don’t even know you have. They are like unconscious “brain software,” running silently in the background.

So the first step is to bring those unconscious and potentially damaging beliefs up to the surface so you are aware of them. You can’t fix a problem if you don’t know you have one.

2 Quick Questions That Will Help Draw Out Your Beliefs

Beliefs can go back to childhood, but don’t worry, you don’t have to go to a psychotherapist and be regressed back to kindergarten. It’s simpler than that. But it does pay to do this questioning process as a formal “exercise” with serious quiet time, with pen and paper (instead of just thinking about it).

Question #1: What causes me to be overweight (or unhealthy, or not having the body I want)?

Question #2: What’s preventing me from getting leaner? (or healthier?)

Spend some time with it and see how big of a list you can create. Ask yourself whether each belief helps or hurts you. Does it move you forward or backward. Does it empower or disempower you? The ones that hurt you or hold you back will be obvious. You may come up with beliefs such as:

“I’m overweight and I can’t get leaner because”:

I have no time I’m too old I can’t stop eating I hate exercise You just can’t do it when you have 4 kids It’s impossible after having a hip replacement

But the million dollar question is: are these beliefs actually true?

Beliefs are not facts. You may hold your beliefs as absolute reality, but when you deconstruct them and challenge them, you may see that they don’t hold any water.

Self limiting beliefs are false interpretations (negative thought patterns) that hold you back. And you keep holding on to them because making excuses and staying the same is a lot more convenient than changing, isn’t it? Change requires hard work, effort and leaving your comfort zone.

Your mission now: weaken the limiting beliefs and get rid of them

STEP 2: CHALLENGE THOSE BELIEFS

How do you challenge a belief? 4 ways:

(A) Challenge it directly: Is the belief even valid at all? See if you can find a “counter example” that disproves your belief. For example; if you think that after you’ve had 3 or 4 kids, it’s impossible to get a nice flat stomach, what will you say after I introduce you to a dozen of my clients and readers who had 3 or 4 kids and went from bulging belly to rock-hard flat stomach? If they did it, then how could your belief be valid? Answer: It WASN’T! You believed something false and inaccurate and it was holding you back!

(B) Challenge the source: Is it your belief, or have you been living what your parents, peers or culture handed down to you? Just the realization that a belief wasn’t yours to begin with is enough to shatter it.

(C) Challenge the usefulness of the belief: Ok, so you believed something when you were younger. Does still believing it has any usefulness today? Does it help you move closer to what you want in your life today? If not, then wouldn’t today be a good time to get rid of it?

(D) Challenging the belief by weighing the consequences: If you keep this belief, what is it going to cost you? What will the pain be like? What will you miss? And what will these consequences be if you don’t change it NOW?

STEP 3: INSTALL A NEW BELIEF

Nature abhors a vacuum, as Spinoza once said. You don’t simply get rid of a belief, you must also replace it. What things would you want and need to believe instead that would create positive behaviors that would move you toward your goal? Write them down, then massage them into an affirmation. For example, if you’ve hung your hat on the belief that you didn’t have time to exercise, could you write a new affirmation of belief similar to this?

“I’m a very busy person, so that means I must set clear priorities and I must keep my health and body on the top of my priority list. I always schedule time for my most important priorities, I am efficient with my training, and I use every minute of my day wisely. And if Barack Obama, the busiest person in the world, can train for 45 minutes a day 6 days a week, there’s no excuse for me. I can do it too.”

Write down your new belief affirmations and read them, right along with your goals, every day.

Then “activate” this affirmation by doing what Olympic and professional athletes do: engaging in mental rehearsal. Visualize yourself carrying out the behaviors that this belief would generate. Think about and feel what it would be like to take those positive actions steps and play mental movies of how your life would change by doing so. Involve all your senses: see it, hear it, feel it.

Keep it up until you start to see your behavior change and your habitual actions come into alignment with your goals/intentions. If you’re diligent, you’ll see changes in attitude and behavior with 21-30 days. It may happen sooner. It may take longer if you’ve carried deep, lifelong limiting beliefs. But in less than a month, the roots of the new belief pattern will be formed.
Then you can update your goals and affirmations to reflect your current priorities and move on to the next goal you want to achieve or the next limiting belief you want to change. Keep THAT up, and pretty soon, you will be LIMIT-LESS!
BELIEVE ME, spending quality time understanding and working on your beliefs is a lot more productive than spending time in forums arguing about whether a low carb program is better than a high carb program… or even whether the cure for obesity is found in the arcuate nucleus of the lower hypothalamus. It’s in your head all right… but most people have been looking in the wrong place.
Train hard and expect success.

Tom Venuto Fat Loss Coach www.BurnTheFat.com!
About the Author:Tom Venuto

Tom Venuto is a fat loss expert, lifetime natural (steroid-free) bodybuilder, independent nutrition researcher, freelance writer, and author of the #1 best selling diet e-book, Burn The Fat, Feed The Muscle: Fat-Burning Secrets of The World’s Best Bodybuilders & Fitness Models (e-book) which teaches you how to get lean without drugs or supplements using secrets of the world’s best bodybuilders and fitness models. Learn how to get rid of stubborn fat and increase your metabolism by visiting: www.BurnTheFat.com!


A “Mind Training” Technique That Makes You Stronger

Title: A “Mind Training” Technique That Makes You Stronger

Author: By Tom Venuto

 Word count: 691 words

A “Mind Training” Technique That Makes You Stronger By Tom Venuto www.BurnTheFat.com!

The word “visualization” sometimes conjures up images of new age gurus teaching esoteric techniques for personal enlightenment and “attracting” what you want into your life. This causes many evidence-based types to scoff. However, piles of research has shown that mental imagery (aka “visualization”) can improve performance. The latest study suggests that a certain type of mental imagery can also increase your strength

Olympic champions and professional athletes have used visualization and mental rehearsal techniques for decades. Not only is visualization one of the most widely accepted techniques in sports psychology, it’s supported by scientific research.

Nevertheless, many people remain skeptical.

Some people agree that mental rehearsal might enhance specific skills, like a golf swing or a basketball throw, but they question whether it could make you stronger, increase muscle growth or help you lose weight.

A new study published in the Journal of Strength and Conditioning Research suggests that indeed, mental imagery can make you stronger. This study also begins to explain how mental imagery works on a neurological level…

Twenty two sports students, with a mean age of about 20, participated in the 6-week long experiment. Prior to the study, none had done mental imagery before. The students were divided into a control group and a mental rehearsal group.

The goal was to see if mental imagery could increase bench press and leg press strength.

Each participant was given very specific instructions on how to perform the mental imagery. During the rest period between sets, they were to vividly imagine the exercise movement and the muscle contractions generated from each rep.

After 12 workout sessions, the mental imagery group had significantly increased their strength more than the control group, especially in the lower body (leg press).

The researchers concluded:

The results provided evidence that mental imagery did contribute to improve strength of the leg muscles without any macroscopic structural change”

What they were saying is that the duration of the study wasn’t long enough that there was any major muscle size increase, so they credited the strength increase to non morphological adaptations.

It’s well known in exercise science that gains in strength occur from changes not just in the muscle fibers and surrounding tissues, but in the nervous system.

That gives us clues about how mental imagery works.

Put simply, mental training techniques, (since they’re working with your brain/nervous system – as the name implies), can trigger some of the same neurological adaptations that occur from physical training.

Apparently, mental imagery can increase synchronization of motor units in muscles, having large corresponding cortical areas in the primary mortor cortex.

There are also psychological benefits, such as increased motivation, improved focus during the set, technique improvements, more confidence and less apprehension or anxiety. But clearly, there’s more to this than just “psyching up.”

Here’s something else interesting. The researchers even suggested that mental imagery could decrease strength loss when athletes are inactive due to injury.

This recent study is a practical one because it gives us one specific technique that you can apply to your next workout: vividly imagine a successful lift for the upcoming set while you’re resting between sets.

NOTE: it’s important to mentally see (visualize) the exercise and mentally “FEEL” the muscle contraction. This is multi-sensory – both visual and kinesthetic.

In some of my previous articles, I talked about density training and superset training as excellent techniques for busy people because these methods reduce rest intervals, making the workout time efficient.

But the rest time between heavy sets doesn’t have to be wasted – now you know what to do with that time…

Instead of chatting with your gym buddies, or scoping out the attractive bods in the gym, you can be mentally rehearsing your next set… and enjoying the strength increase that follows.


Most fat loss programs only focus on diet or physical training. If you want to learn more about how you can add “mental training” techniques to increase fat loss, muscle growth and muscular strength, then be sure to check out chapter one in my ebook, www.BurnTheFat.com!.

Tom Venuto, author of Burn The Fat Feed The Muscle www.BurnTheFat.com!

Founder & CEO of Burn The Fat Inner Circle Burn the fat inner circle

About the Author:

Tom Venuto is the author of the #1 best seller, Burn the Fat, Feed the Muscle: Fat Burning Secrets of the World’s Best Bodybuilders and Fitness Models. Tom is a lifetime natural bodybuilder and fat loss expert who achieved an astonishing 3.7% body fat level without drugs or supplements. Discover how to increase your metabolism and burn stubborn body fat, find out which foods burn fat and which foods turn to fat, plus get a free fat loss report and mini course by visiting Tom’s site at: www.BurnTheFat.com!


Il Grip….”Je damo du giri de nastro….”

Titolo:  Il Grip….”Je damo du giri de nastro….”

Autore: Piero Maina

Conteggio parole:  1781

Oggi parliamo del grip, elemento fondamentale nel trittico che compone il bastone da golf. Come già sapete gli altri due componenti sono la testa del bastone e lo shaft. Il grip quindi non va sottovolatuato in termini di importanza in quanto è l’unico elemento che ci permette di rimanere in contatto con il bastone e ne crea la connessione con il nostro corpo.

Ho dato un titolo appositamente provocatorio a questo articolo sul grip perchè la frase messa fra le virgolette è quella che si sente dire maggiormente qui dalle mie parti anche fra gli addetti ai lavori e da chi cambia i grip abitualmente, ma alla fine “…i du giri de nastro…”  se devo metterli, li metto anch’io, solo che la cosa non funziona propriamente così e quindi cercherò di fare chiarezza su questo elemento.

Premesso che non ci vuole molta scienza per cambiare un grip e a livello di manualità lo può fare anche una scimmia ammaestrata; quello che forse risulterà più complicato è sapere quali sono i parametri di cui bisogna tenere conto. Non esistono “giri di nastro” esistono diametri, diametri ben precisi che vanno raggiunti utilizzando il giusto grip per quel dato “butt” dove verrà installato, oppure per i diametri sopra lo standard, utilizzando tecniche di ingrandimento tramite i famosi giri di nastro o ancora, per i diametri sotto lo standard, di riduzione utilizzando grip dal diametro differente o tecniche di montaggio diverse.

Spieghiamoci meglio: Il diametro standard per un grip da uomo viene SEMPRE misurato a 2 pollici (5,08 cm.), dalla fine del bastone (butt), lateralmente. Questo anche perchè il grip oltre ad essere prodotto con sezione totalmente circolare chiamato “round”, viene proposto anche “ribbed” e quindi con una costoletta che normalmente viene montata in posizione posteriore. (Attenzione a non montare un grip ribbed con la scritta dietro (back) perchè lo montereste in posizione sbagliata e quindi questo processo può essere attuato solamente per grip round). Quale sia meglio utilizzare fra ribbed e round è totalmente soggettivo e ci sono giocatori di torneo che giocano con i grip ribbed e altri fra cui Tiger Woods che utilizzano grip round. Per la cronaca Tiger utilizza grip “Full cord” (tutta corda) round montati con la scritta back. Comunque anche i giocatori che sono soliti utilizzare grip ribbed, almeno sui wedges utilizzano grip round, visto che con i wedges giocheranno colpi con la faccia del bastone non sempre square e quindi è bene non avere “distrazioni” nelle mani. Tornando al nostro diametro standard uomo, il diametro che dovremo ricavare a 2″ (5,08 cm.) dal butt misurato lateralmente sarà di 0.900″ ( 2,286 cm.). Ho riportato qui per referenza le misure convertite in cm., ma d’ora in poi scriverò utlizzando misure in Imperial, visto che tutto ciò che è golf viene sempre presentato con misure Anglosassoni e per chi non avesse dimestichezza, sui calibri esiste sempre la doppia misurazione per chi la volesse anche nel sistema metrico. Torniamo a noi.

Abbiamo imparato che la misura standard uomo è di 0.900″ misurata a 2″ dal butt lateralmente. Esiste solo questo diametro come referenza ed eventualmente la misura standard per i grip da donna che è 0.850″. Il problema però è che non sapendo queste cose, nè sapendo dove misurare crediamo a torto che tutti i diametri siano uguali e quando qualcuno si lamenta che il grip è troppo piccolo rispetto alle sue mani o al suo modo di impugnare il bastone, allora si generalizza dicendo “…je damo du giri de nastro…”. Purtroppo i diametri interni dei grip non sono tutti uguali, così come i diametri del butt dello shaft non sono tutti uguali e quindi se un grip da uomo M60 sarà montato a regola e verrà installato su uno shaft dal diametro del butt di 0.600″, allora si che otterremo i famosi 0.900″ che sono il diametro standard, ma spesso il grip è M58 o L58 e il butt 0.580″ o 0.620″ oppure il grip viene montato stirandolo troppo e allora le cose cambiano.

Come al solito non voglio fare un articolo troppo tecnico che spieghi come ottenere i vari diametri, ma solo orientare il giocatore medio verso una conoscenza maggiore e a non fare o farsi fare lavori improvvisati che invece di aiutarlo lo danneggeranno. Un’altra problematica che sorge alla sostituzione del grip può essere quella dell’alterazione dello swingweight. I grip sono prodotti in misure,materiali e pesi diversi, pertanto anche lo swingweight può cambiare. Un punto di swingweight equivale a 2 gr. e per ogni 5 gr. +/-  di differenza nel grip  potreste vedere cambiate le caratteristiche di gioco nel vostro bastone senza rendervi conto del perchè.

Torniamo ai nostri diametri prima di chiudere l’articolo. Ricordate che nel mondo del clubmaking si è soliti partire dalle misure standard e a chi richiede misure superiori allo standard men si procederà con questa scala in frazioni di pollici: + 1/64″, + 1/32″, + 1/16″ (Midsize) e + 1/8″ (Jumbo) per i grip più grossi; chi invece richiederà misure più piccole otterrà -1/64″ under lo standard men per poi arrivare alle misure da donna. Non necessariamente solo da donna, ma anche per mani di golfisti sia maschi che femmine che necessitano di misure più piccole di quelle soprammenzionate con questi diametri: per le misure over lo standard donna avremo +1/64″ e +1/32″ e -1/64″ under lo standard donna per quelle più piccole fino ad arrivare alle misure da bambino.(diametro per shaft da 0.500″). (Nota:Va da se che si possono ricavare anche misure intermedie rispetto a quanto sopra riportato, ma queste sono le misure di riferimento nel mondo dei bastoni da golf).

Il discorso dei diametri se compreso non è cosi difficile, ma bisognerà tenere conto di tutte le variabili in questione, tra cui anche lo spessore del nastro da utilizzare per ingrandire il diametro e anche del peso di quest’ultimo ed inoltre anche della grandezza delle mani che impugneranno quel tale bastone e il modo in cui verrà grippato che viene influenzato non solo se il bastone sarà tenuto più o meno fra le dita o il palmo, ma anche dalla postura tenuta all’address e quindi dal lie del bastone.

Anche i materiali hanno la loro importanza nel “feeling” del grip e attualmente c’è veramente l’imbarazzo della scelta per disegni, colori e densità delle gomme utilizzate. Ad esempio i grip costruiti con la corda hanno si il vantaggio di dare maggiore “trazione” in caso di mani sudate o di tempo bagnato, ma di contro danno al giocatore sensazioni più “dure/sgradevoli” soprattutto se usurati o sporchi. Una parola anche per chi soffre di artrosi/artrite; per loro va bene anche un grip normale, ma un diametro molto più grosso può essere un valido aiuto fino ad arrivare ai grip specifici costruiti con delle protuberanze che riducono le vibrazioni e permettono di tenere il grip anche se le mani non chiudono bene. Non sottovalutate il materiale che utilizzerete per i vostri grip, sceglietelo con cura e avrete una valenza in positvo se le sensazioni ricavate saranno di comodità e controllo.

Un ultima nota è per l’eventuale ingrandimento del grip sotto la mano destra. Come sapete i grip si riducono di diametro scendendo verso il basso e quindi avremo un diametro nettamente inferiore sotto la mano destra (per i giocatori destrorsi), anche se a seconda della tecnica che utilizzeremo per grippare il bastone questo non sarà un problema. C’è comunque un metodo per aumentare il diametro sotto la mano destra, naturalmente senza infrangere le regole del golf che non vogliono “rigonfiamenti” lungo il grip dei ferri e legni. Se installeremo ad arte questi spessori ottenuti con il nastro il tutto sarà ritenuto regolare e permetterà ad alcune categorie di golfisti di trarre beneficio da un diametro meno ridotto sotto la mano destra e quindi di evitare eventuali “rigrippamenti”  involontari soprattutto all’apice dello swing oppure una vera e propria sensazione sgradevole nel sentire la mano destra “vuota”, spesso dovuta anche al modo di impugnare il bastone.

A questo punto qualcuno si domanderà:” ma se il grip con cui attualmente gioco non è della grandezza adatta a me, in quale tipo di errore incorrerò?”  La risposta non è una sola e bisognerà anche vedere se il grip è troppo piccolo o troppo grande. Come già esposto sopra, il grip è l’unico elemento che ci consente di mantenere il contatto con il bastone e di controllarlo durante lo swing, soprattutto nell’area d’impatto, permettendoci di effettuare correttamente la rotazione degli avambracci e il rilascio dei polsi. Quindi a grandi linee per grip dai diametri troppo grossi si potrebbe rilevare una diminuzione nelle sensazioni e una ridotta mobilità nell’azione dei polsi con un’affaticamento degli avambracci e quindi uno scarso “release” e pertanto la difficoltà a chiudere i colpi che tenderanno a terminare verso destra rispetto all’obbiettivo o anche la tendenza ad impugnare il bastone più corto per ricercare un diametro più confortevole. Di converso un grip dal diametro troppo piccolo potrebbe darci una sensazione di “vuoto” nelle mani con conseguenze di avere il bastone troppo mobile e questo ci farà probabilmente stringere troppo il bastone causandoci tensioni negli avambracci, non consentendo ai polsi di lavorare nella maniera ottimale. Ma anche di avere troppa azione di mani proprio perchè troppo piccoli e quindi con una tendenza a tirare la palla verso sinistra rispetto all’obbiettivo. Diversamente dal grip troppo grosso poi, si tenderà ad impugnare verso la fine del bastone alla ricerca di un diametro maggiore con il rischio di perdere il controllo del bastone soprattutto all’apice dello swing

Non dimentichiamoci il grip del putt, qui il discorso è ancora più importante e trovare il giusto equilibrio fra peso, grandezza, forma e materiale è parte del processo di fitting del putt. Oggigiorno vengono prodotti grip di dimensioni enormi con pesi ridotti anche a 50 gr. per misure jumbo (che è il peso di un grip standard), contro i 250 gr. di qualche anno fa. Questo vuol dire il poter “sentire” ugualmente il peso della testa ed avere un’azione minore dei polsi/mani. Di base un grip più grande dello standard, diciamo pure midsize sarà più tollerato sul putt, ma è sempre bene verificare per ogni giocatore quali sono le sue necessità e di come il grip si integrerà su quel dato putt. Non dimentichiamo anche il piacere visivo che è poi l’aspetto mentale che nel golf è determinante. Questo per dire che comunque il grip oltre ad essere l’unico punto di contatto con il bastone è anche un elemento di “feeling” e quindi sono anche le sensazioni e il modo di impugnare che ci faranno capire il diametro più adatto a noi senza tenere conto delle sole tabelle di misurazione di partenza. Chiudo ricordandovi che se volete montarvi i grip da soli, potete pure farlo, ma almeno fatelo bene e con le giuste conoscenze. Buon gioco!

© Copyright Piero Maina – Tutti i diritti riservati